published on 20.01.2019

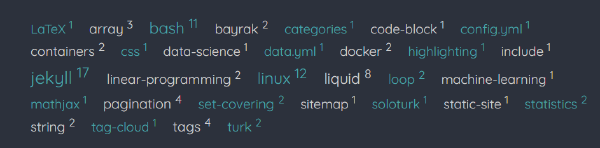
Tag Cloud. Bloglarda karşımıza çıkan klişe yapı. Wordpress kullananlar automatic generate ediyorlardır, Jekyll için ise belki vardır plugin ama biz kendimiz oluşturacağız.

Öncelikle tag-cloud.html adı altında bir include dosyası oluşturalım. Böylece daha sonra arşiv sayfasında, tag ya da post layoutlarında çağırabiliriz. {% include tagcloud.html %} Aşağıdaki kısa kod tüm işi yapmaya yeterli. Credits goes to this guy.

{% capture site_tags %}{% for tag in site.tags %}
    {{ tag | first }}
{% unless forloop.last %},{% endunless %}{% endfor %}{% endcapture %}

{% assign site_tags = site_tags | split: ',' %}

{% assign total_tag_count = 0 %}
{% for tag in site_tags %}
{% assign total_tag_count = total_tag_count | plus: site.tags[tag].size %}
{% endfor %}

<div>
{% for tag in site_tags %}
{% assign rel_tag_size = site.tags[tag].size | times: 2.0 | divided_by: total_tag_count | plus: 1 %}
    <a href="/tag/{{ tag }}" style="font-size: {{ rel_tag_size }}rem;">{{ tag }}</a>
{% endfor %}
</div>

site.tags, sitedeki tüm taglerin tutulduğu bir dizi ama sadece tag adlarını tutmuyor, o tagi kullanan dökümanları da saklıyor. Bize sadece unique tag adlarından oluşan bir liste lazım ve ilk adımda bunu yapıyoruz ve site_tags dizisini elde ediyoruz.

İkinci adımda artık herbir tag için görece boyut hesaplayacağız. Toplam geçen tag sayısını buluyoruz (unique değil, tekrarları da sayıyoruz). Bir tagin kaç kere geçtiğini buluyoruz ve buna göre inline css ile font-size’ı değiştiriyoruz. Böylece daha çok kullanılan etiket bulutta daha büyük görünüyor.

Relative Tag Size = Constant + (Tag.Count * ConstantMultiplier / TotalTagCount)

Tag Cloud with Relative Font Size

Burada dikkat edilmesi gereken iki konu var.

  1. Tag cloud’daki bir etikete tıklandığında userı, o tag ile ilgili bir sayfaya yönlendirmelisiniz. Bunun için, Etiketler‘i okuyabilirsiniz.

  2. Eğer collection yapısı kullanıyorsanız, site.tags yalnızca, posts collection’ı altındaki tagleri döndürecektir. Eğer tüm koleksiyonlardaki etiketleri istiyorsanız aşağıdaki gibi elde edebilirsiniz.

{% assign all_tags = '' | split: ''%}

{% for document in site.documents %}
    {% assign all_tags = all_tags | concat: document.tags | unique %}
{% endfor %}
You are reading the 13rd of 19 episodes in Jekyll.
Published on 20.01.2019 by Mert Bakır with commit de81d3f.
jekyll
#jekyll #static-site
Next episode:
Sıradaki Yazılar
published on 20.01.2019

Bir postun altına, sıradaki N adet postun linkini nasıl ekleriz? Pagination, ama previous ile next yerine next N post. N, sizin seçeceğiniz bir sayı. Pagination adlı yazıda, önceki ve sonraki yazıları nasıl elde edeceğimizi anlatmıştım. Bir de uzunca ve build time kötü etkileyecek ama teoride …

published on 21.01.2019

Jekyll’da varsayılan olarak gelen yapıda tüm postları _posts/ klasörü altında tutarız. Post sayısı arttıkça postları gruplama, alt klasörlere bölme ihtiyacı duyabilirz. Jekyll hâlâ postları görecek ve site.posts değişkeni, _posts/ ve altındaki tüm alt dizinlerdeki tüm postları getirecektir. …

published on 21.01.2019

Jekyll’da dosyalara front-matter eklerken çoğunlukla tekrara düşebiliriz. Örneğin, birçok dosyaya aynı layoutu, layout: default, layout: post, kategoriyi category: your_category veya koleksiyonunuza özel belirlediğiniz custom attributeları eklerken benzer dosyaların herbirine, aynı satırları …

published on 10.07.2022

Previously, I’ve published a blog post about deploying static content on heroku with basic authentication. The main purpose was to get basic auth for a freely hosted static website. In that post, we hosted the source code on GitLab and configured a CI/CD pipeline to render the static content …

published on 28.05.2022

Each git commit has a field called Author which consists ‘user.name’ and ‘user.email’. We usually set these variables once, after installing git, with git config --global so that each repo gets the variables from the global definition. We can also set them locally for a …

published on 25.05.2022

In this post, I’ll first walk through hosting static content with basic authentication. Then, we’ll look into deploying to Heroku using GitLab Pipelines, more specifically deploying a certain sub-directory within the project instead of pushing the whole project. Also, I’ll share …

published on 17.04.2022
edited on 15.07.2022

Önceki bölümde, markdown formatını LaTeX formatına dönüştürmek için kullanılan Pandoc yazılımından bahsetmiştik. Şimdi konuyu bir adım daha ileri taşıyıp ve bookdown’a geçiyoruz. Bookdown; Rmarkdown kullanarak teknik dökümanlar, kitaplar yazabilmemizi sağlayan, Yihui Xie tarafından yazılmış …

published on 10.04.2022

I’ve been using WSL-2 on Windows for over a year. It’s very useful because some Python packages are just a headache to install on Windows. Also, docker. It’s just better on Linux. Yet, WSL-2 can also be problematic. I remember trying a dual-boot setup when things just went way too …

published on 03.03.2022

In this post, I’ll share how to install geopandas and some other gis related packages on Windows. If you are on Mac or Linux you can probably just pip install those without any issue. I usually had to do a google search every time I wanted to install these packages on Windows environment. Of …