How To Install CPLEX with IBM Academic Initiative?

This post is for fellow students who is studying Operations Research with CPLEX. If you don’t know already, IBM offers free academic license for IBM ILOG CPLEX Optimization Studio.

  1. First, you have to register IBM Academic Initiative with your academic instituion issued email. (e.g. foo@university.edu, foo@university.edu.tr)

  2. Then, Login and go to here.

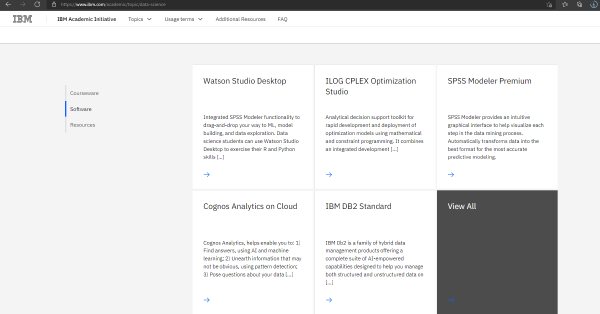
  3. Find the “IBM ILOG CPLEX Optimization Studio” under Softwares sections.

IBM Academic Initiative Softwares
  1. Navigate to “Downloads”.
IBM ILOG Optimization Studio
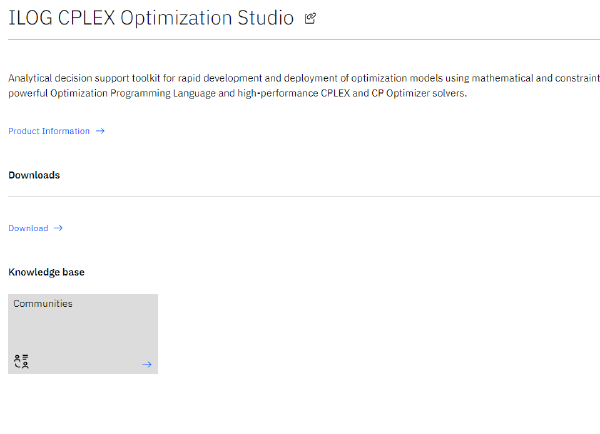
  1. Find the version that suits your environment and download.
Setup Images
Setup Images
  1. If you are using Windows, you’ll see a GUI, and as usual just click Next, Next.

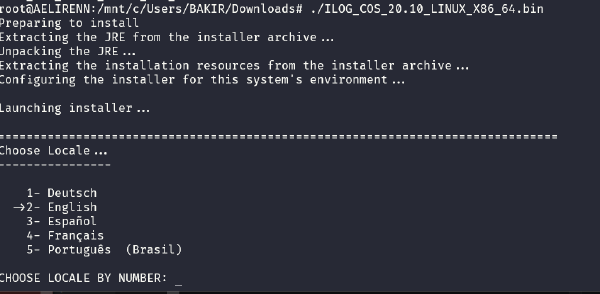
  2. If you are on Linux, you probably already know how to install a package.

  • chmod +x to give execute permission to the file.
  • Then execute it. ./filename
  • Follow the instructions given by the installer.
Setup Images
Setup Images
  1. Now you have installed the Optimization Studio and CPLEX solver with it.

After the installation, you can see the Interactive Shell using cplex command in command prompt.

Of course the Environment Variables must be defined, and it should be automatically (usually after a restart on Windows).

CPLEX Interactive Shell

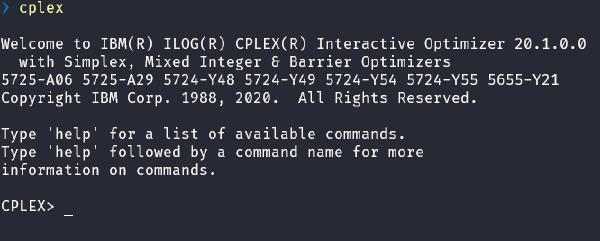
This is not how we are going to use CPLEX though. You can type quit to exit the shell.

In the next post, I’ll share an example about how we can use CPLEX with Python using docplex library.

Before that we must install cplex package for python using the setup.py included in the directory that you installed CPLEX. e.g. C:\Program Files\IBM\ILOG\CPLEX_Studio201\cplex\python\3.7\x64_win64\setup.py

python path_to_cplex\python\setup.py install

SIMILAR POSTS

published on 10.07.2022

Previously, I’ve published a blog post about deploying static content on heroku with basic authentication. The main purpose was to get basic auth for a freely hosted static website. In that post, we hosted the source code on GitLab and configured a CI/CD pipeline to render the static content …

published on 28.05.2022
edited on 30.12.2025

Each git commit has a field called Author which consists ‘user.name’ and ‘user.email’. We usually set these variables once, after installing git, with git config --global so that each repo gets the variables from the global definition. We can also set them locally for a …

published on 25.05.2022

In this post, I’ll first walk through hosting static content with basic authentication. Then, we’ll look into deploying to Heroku using GitLab Pipelines, more specifically deploying a certain sub-directory within the project instead of pushing the whole project. Also, I’ll share …

published on 17.04.2022
edited on 30.12.2025

Önceki bölümde, markdown formatını LaTeX formatına dönüştürmek için kullanılan Pandoc yazılımından bahsetmiştik. Şimdi konuyu bir adım daha ileri taşıyıp ve bookdown’a geçiyoruz. Bookdown; Rmarkdown kullanarak teknik dökümanlar, kitaplar yazabilmemizi sağlayan, Yihui Xie tarafından yazılmış …

published on 10.04.2022

I have been using WSL-2 on Windows for over a year. It’s very useful because some Python packages are just a headache to install on Windows. Also, docker. It’s just better on Linux. Yet, WSL-2 can also be problematic. I remember trying a dual-boot setup when things just went way too much …

TAG CLOUD