
I’ve been searching for a good workflow for publishing Jupyter or RMarkdown Notebooks as static blog posts. I think, I found the optimal solution for my use case. In this post, I’ll explain my workflow and why chose this way with examples.
What’s Wrong With IPython Notebooks
Currently, I work with Python and usually with Jupyterlab. I can’t say that I like jupyter notebooks. Still, they work fine for small projects and the notebook concept is good if you investigating something, taking notes or plotting graphs besides the code. What I don’t like about jupyter notebooks, is that they are JSON files. You may ask “what’s wrong with that?”. Well, let me tell you:
- You can’t just open jupyter notebooks in any code editor and edit them.
- Jupyter notebooks feel slower than normal code editors.
- I don’t like the extensions and the dependencies.
Most importantly, you can’t get clear diffs because notebooks are JSON files.
I’ve tried an extension called jupyterlab-git but the results weren’t satisfying for me.
So, I want:
- Normal diffs
- Ordinary text document
- Notebook logic
Convert Notebooks
Now, let’s take a step back and remember the main objective: Notebooks to Hugo.
To be honest, I’ve tried to convert jupyter notebooks to markdown using jupyter nbconvert. It wasn’t successful. I’ve also tried couple of scripts created by community but results wasn’t good. You can try in your environment if you are already using jupyter notebooks.
jupyter nbconvert .\foo.ipynb --to markdown --NbConvertApp.output_files_dir=.
So, we get good normal diffs, and standard text file with Rmarkdown. How can we convert it into HTML? That’s where blogdown comes in. Blogdown is an R package, created for generating static websites using Rmarkdown. Of course, my blog is already generated by Hugo and compatible with the blogdown library. So, I just simply did the following:
- open up rstudio
- open my existing website as a new R project.
- serve site using the addins or by running
blogdown::serve_site() - add post using the addins or create an Rmarkdown document or with
blogdown:::new_post_addin()
And it’s rendered auto-magically, I can now focus on the notebook. I suggest you to use blogdown & hugo for ease of use but you can still use blogdown with other static site generators. Even more, you can write your notebook using Rmarkdown then convert it into the format you want using knitr but that also requires to learn about knitr.
What About Python
Yes, we can use Rmarkdown files. Run R code chunks in it. Convert the Rmarkdown into html files and serve it as a static site. But what about Python?
Turns out we can actually run Python code in Rmarkdown. R has a library called reticulate which allows us to run Python via R.
```{python}
import plotly.express as px
iris = px.data.iris()
iris.describe()
```
You just need indicate that code chunk belongs to python. It might be useful to set shortcuts for python/r code chunks in the IDE you are using.
Reticulate also allows us to combine R and Python code. Even though it’s an exciting feature, I don’t think most of us will need it. It might be useful for certain scenarios.
Conclusion
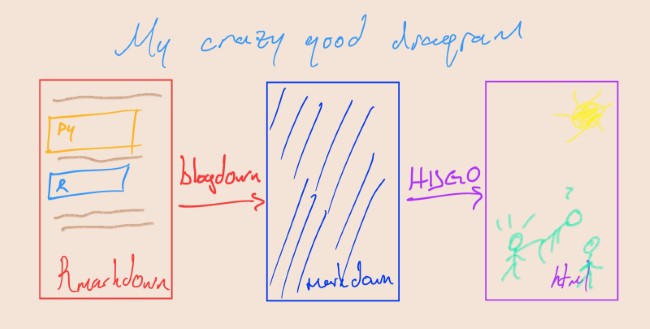
In summary, we write in Rmarkdown. Blogdown converts it into markdown and then, Hugo processes the markdown file, generates an html file for publishing to web.
Here are the most important benefits of using Rmarkdown for me:
- We are not dependent on Hugo or RStudio. You can work on VSCode if you want to.
- We can open Rmarkdown document in anywhere and read what’s inside.
- Most importantly, we have normal diffs with git.
As a side note, if you are using built-in syntax highlighters you should use
.Rmarkdownextension, not.Rmd. Otherwise, you’ll need a syntax highlighter library likehighlight.js. If you are already using client side syntax highlighting then it shouldn’t matter which extension you choose.
In the next post, I’ll share examples of adding plots generated by Python code in Rmarkdown document.